Twilight Terrace
| Chapter 1: Twilight Terrace | ||||||||||||||||||||||||||||||||

| ||||||||||||||||||||||||||||||||
| Now we're getting into the swing of things! | ||||||||||||||||||||||||||||||||
| ||||||||||||||||||||||||||||||||
| ||||||||||||||||||||||||||||||||
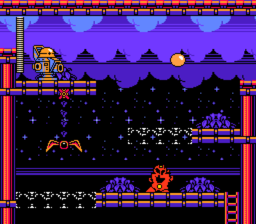
Twilight Terrace is the seventh/eighth level in Chapter 1 of Make a Good Mega Man Level: Episode Zero. Set within a vibrantly coloured flower garden at night, the level revolves around two different gimmicks. One of them is Super Mario Maker 2's Swinging Claws, which Zero can use to cross long gaps, and the other is a Switch Block variant that is tied to his jumps. Flower-themed enemies are a common sight; in addition to Flower Presenters, multiple Hanabirans are encountered, each one having a new attack they do when retreating. A modified Hanabiran variant also appears as a common enemy, with a unique design and different way of attacking.
Strategy
Swinging Claws are introduced early on, and are used to cross over bottomless pits and reach higher areas in the first several sections. While most enemies here can be easily dealt with using the Z-Buster, the partially-shielded Taban and Metall Cannon are best handled with the Z-Saber. Right after the first checkpoint is a Hanabiran, with its spawn areas marked with background exclamation marks. Unlike normal Hanabirans, this one creates a line of harmful pellets across its x-axis when diving underground; a Swinging Claw in the room can be used to avoid this attack. A second checkpoint follows this miniboss, which introduces Zero to jump-sensitive Switch Blocks. Airdashing and other actions that use the jump button do not trigger these blocks.
While moving down a shaft with Switch Blocks acting as volatile platforms, the enemy variant of Hanabiran is seen alongside Flower Presenters that attack from afar. Hugging the right wall when falling to the screen below lets Zero access a slide passage with two large Bolts, which is impossible to reach otherwise. In the next section over, Switch Blocks form temporary walls and floors, with each jump always changing the terrain. Be careful not to jump at the wrong moment, or else falling into a pit is likely. After a small vertical climb to get past a Key Barrier, another Hanabiran appears. This one only spawns in the top and bottom halves of the room, making the middle a safe spot from its pellet row attack.
Swinging Claws start appearing alongside Switch Blocks, with multiple puzzles requiring Zero to use the former while a set of blocks are either on or off. An important thing to remember is that jumping free from a Claw will turn blocks on or off, just as jumping from the ground will. To the left of a Metall Cannon in the first room to use the two gimmicks is an optional fight with another Hanabiran. This fight is easily the most difficult of the three, as it happens in a cramped arena with little room to avoid its attacks, but defeating it opens a room with an E-Tank, a CD, and a teleporter back to the main path. Towards the end, enemies like Hanabirans and Flower Presenters try to damage Zero from afar while he crosses a pit using Swinging Claws. If taking a hit is inevitable, it is best to do so while in a claw's grip, to prevent falling to one's death. At the very end, however, is a boss fight against Honey Woman.
Z-Phone Dialogue
Notes
- Originally, Twilight Terrace was named "Double Gimmick Garden". Additionally, older versions featured Adamskis that instantly killed the player on contact, and used a vanilla Hornet Man tileset. Various devkit Robot Masters also took the place of the Hanabiran minibosses.
- The level's music is an arrangement of the track "Welcome to the City" from Deltarune Chapter 2, which was posted on Twitter by its composer, Toby Fox, before its release. As Episode Zero predates Deltarune Chapter 2 by more than a year, this marks the only time a song has debuted in a MaGMML game before the release of the game it was written for.
- A custom Metall based on Ralsei from Deltarune was originally included (first as a regular enemy, then a unique one guarding the CD room), but was cut as QA testers unanimously found it irritating to fight (it had more than 1 HP, a small hitbox, and attacks that were hard to avoid).
- Like most of Chapter 1's levels, Twilight Terrace's spikes are all Damage Spikes that do 7 points of damage instead of instant death.
| Make a Good Mega Man Level: Episode Zero - Chapter 1 | |
|---|---|
| Stages | |
| Explosive Freefall • Surveillance Canyon • Gusty Gorge • Defeat the Giant Spear Man! • Contra Base • Kingdom Crisis • Lost Valley • Skyhigh Ridge • Twilight Terrace • Abandoned Lab • Subterranean Stronghold • Vertical Hunger | |
| List of Bosses | |
| Mega Man • Dangerous Duck • Giant Spear Man • SRARA Up n' Down • Gomeramos King • Dethgerbis • Piranhabiran • Thwomp Man • Honey Woman • Doc Robot Overloaded • Punk • Boomer Kuwanger • Giga Kuwagata | |
| Mini-Stages | |
| Mega City • Dr. Wily's Secret Bunker | |