Space Jam

From Make a Good Mega Man Level Contest
Revision as of 17:33, 12 February 2021 by Spin Attaxx (talk | contribs) (Created page with "{{Levelinfo |align=right <!-- ===========Info============== --> |title=Space Jam |image=256px |caption=Come on and slam, and welcome to the...")
(diff) ← Older revision | Latest revision (diff) | Newer revision → (diff)
Jump to: navigation, search
Chapter 2 : Space Jam

Make a Good Mega Man Level: Episode Zero

MAGMMLEZ-CH2-SpaceJam.png
Come on and slam, and welcome to the jam!

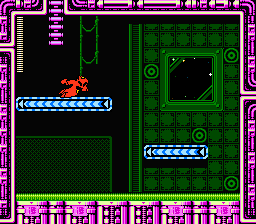
Space Jam is the ninth and final level on the path to the Psycho Chip in Chapter 2 of Make a Good Mega Man Level: Episode Zero. Somehow ending up in space following his journey through a whale's belly, Zero invades a space station filled with stadiums and sports equipment. Much of the latter prefers to play hardball and will attack him on sight, but others are more hands-off. The single gimmick in the level are a type of conveyor known as "Speed Conveyors", which change their directions based on which way Zero is currently facing. Blue ones will always move against him, while orange ones move with him.

Strategy[edit]

Two blue Speed Conveyors act as ledges leading to a high ladder, giving Zero an opportunity to learn how they work. Up top, a number of blue Cargou Qs and Dockalockers appear, with some Curlingers sliding on blue Speed Conveyors. Shortly afterwards is a long blue conveyor, with a Golf Cart resting on it. While these enemies don't actively attack Zero, the Speed Conveyor will carry it in its current direction, and few weapons can even damage the Golf Cart. To bypass it, Zero needs to airdash over it while the Speed Conveyor carries it to the left. A few more Golf Carts on Speed Conveyors appear shortly before the first checkpoint, with a Fake Ball appearing from behind the background.

At the checkpoint, Wallingers — a wall-crawling Curlinger variant — bounce themselves off of walls in an effort to snipe Zero when he drops down/jumps up into their path. The next room features an orange Speed Conveyor (which will always move in Zero's current direction), as does the section after that. Beneath said section's conveyor is a CD, resting on a ledge beyond some pits and a red Mecha Pitchan. After some more enemies and another checkpoint, Speed Conveyors almost completely replace solid ground, with bottomless pits and death spikes always close by. Taking damage from enemies here can be dangerous, as the hitstun effect can last just long enough for a Speed Conveyor to send Zero into inevitable doom.

Beyond another checkpoint, a vertical scrolling section follows, with Wallingers continuously spawning from holes in the background, and Fake Balls ambushing and/or sniping Zero from their positions. If need be, the Z-Saber can be used to knock Wallingers backwards with one slash, killing them quicker than other weapons can. Death spikes are plentiful here, and a small box of them appears near a Wallinger spawner at one point. The final challenge of the stage puts Zero above three levels of orange Speed Conveyors, each of which carry him into harm's way (such as Wallingers, a non-moving Golf Cart, a Fake Ball, or death spikes). If he can get past them and reach the bottom level, all that stands between him and victory is a red Mecha Pitchan and the boss, Baskette Ball.

Z-Phone Dialogue[edit]

Contact Transcript
ZPhoneWily.png Dr. Wily Space Jam?

Oh boy. The crazy space satellite? Yeah, promotional tie-ins get incredibly weird nowadays.

I think companies are strapped for ideas, and in the process they ended up creating a monster.

That's both figurative and literal, by the way. You figure it out.

ZPhoneKrantz.png Agent Krantz Space Jam?

That satellite was running some pretty odd experiments with "Speed Conveyers".

They push towards or against you based on what direction you face, with orange going ahead of you
and blue going behind.

This will also influence anything on the conveyor though, so be careful.

The area is also be[sic] lined with "Fake Balls" which blend in with the background.

ZPhoneGalaxy.png Galaxy Man This one's on a super-dangerous lower ledge! You should see it. The trick's getting down there!

Just be careful and try to play defensive, or snipe your foes from a distance!

ZPhoneYamato.png Yamato Man Yamato Man: Baskette Ball?

Oooh! I feel such potent rage coming from this basketball! The desire to fight in this one is really strong!

If I helped her control her anger, she'd make a wonderful apprentice!

That's it, Zero, I forbid you from injuring her, I'm coming right there!

Zero: Do you have a teleport function?

Yamato Man: No! But just wait, I'll be there before you know it!

Zero: ...You do know I am currently on a space station in orbit.

This basketball shall have long murdered me by the time you get here.

Yamato Man: Hmph! Fine! When it starts bouncing all over the place and speeding up, it'll redirect itself and
aim straight towards your position everytime it hits the ceiling. Keep a close eye on it and you should be fine.

Zero: Thank you.

Yamato Man: Don't mess up! Or, actually, feel free to mess up this time.

ZPhoneKnives.png Knives Knives: Whaaaat? I hate sports! All the cheering and baseballs and basketballs and stuff'll ruin the date!

And that basketball robot'll steal you away and knock you off the satellite into space or something!

But I guess that'll be okay. 'Cuz I know you're immune to burning up in the atmosphere.

Zero: Wha... how?

Knives: How'd you think you survived the castle exploding?! You're invincible, Zero!!

Trivia[edit]

  • The level takes its name and basketball motif from the 1996 live action/animated sports film Space Jam, starring Michael Jordan and Bugs Bunny.
  • The Speed Conveyors in this level expose a quirk of the Megamix Engine; rather than using two separate climbing sprites while on ladders, it only uses one and flips it when necessary. As such, climbing a ladder while Speed Conveyors are onscreen will make them rapidly alternate directions.


Make a Good Mega Man Level: Episode Zero - Chapter 2 Psycho Path
Stages
The Red WoodsVertical Vine VentureString TheoryCursor CorruptionTemporal PillarBubble BaseWicked WaterworksIn the FleshSpace Jam
List of Bosses
Totem Polen PlusTotem Polen EXBone DragonSpider PottonRecluse WomanInternet DestroyerCursorSakuya IzayoiToad Man Bubble BaseSplash Woman's RevengeHaiker GCWU-41BIntest TinheadBaskette Ball
Make a Good Mega Man Level: Episode Zero
Characters
Zero (Costumes) • Dr. WilySRARA (SRARA Up n' DownSRARA JoeSRARA Shield AttackerSRARA Met) • Agent KrantzAgent SternDr. HydeGalaxy ManYamato ManPirate Man
DuoTrioKnives
Special Weapons
Weapons
Z-BusterZ-SaberZ-BurstBlank Drive
Chips
Cutter ChipFlame ChipIcicle ChipZap ChipPsycho Chip
Chapter 1 Stages
Explosive FreefallSurveillance CanyonGusty GorgeDefeat the Giant Spear Man!Contra BaseKingdom CrisisLost ValleySkyhigh RidgeTwilight TerraceAbandoned LabSubterranean StrongholdVertical Hunger
Chapter 2 Stages
Flame Path
Scorched FactoryHot StepsRecoil ReconDispute Over SawbladesScarlet TempleRefurbished PyramidSurfboard ShowdownOffshore Hangar ClusterHorizon Zero
Icicle Path
Frosty FieldsWhen Spike Drops Freeze OverRobot Ink Printing FacilityForgotten Fortress: The LabNocturnal AssaultSpringy ScaffoldingBlocBunkerMidnight AuroraMetropolitan Neapolitan
Zap Path:
Force FacilityPepsi ZeroEntrance SuccessionProjectile Party!Volt Man FactoryLightningrod LabShocking Wacko StageOut of OrderStormy Spire
Psycho Path:
The Red WoodsVertical Vine VentureString TheoryCursor CorruptionTemporal PillarBubble BaseWicked WaterworksIn the FleshSpace Jam
Other:
Construction of ConstructionsMojo DojoS.R.A.R.A. HQ
Chapter 3 Stages
Entrance to Tier XGhouls n' GhastsToxic TunnelsLooping Growth GardenRainbow RavineShift PostingPsionic Space StationIce BreakerCode LandfillLily Airpad
Null and Void
Locations
Mega CityDr. Wily's Secret Bunker
Chapter 1 Bosses
Mega ManDangerous DuckGiant Spear ManSRARA Up n' DownGomeramos KingDethgerbisPiranhabiranThwomp ManHoney WomanDoc Robot OverloadedPunkBoomer KuwangerGiga Kuwagata
Chapter 2 Bosses
Flame Path
Elemental AcesFighting FefnirFire Boy GHBlade Man DOSSparky
Icicle Path
Blizzard ManStomp'nStomp'n VioletHindjoeWafer Wagon
Zap Path
Force GuardPepsi ManOcto BrainReally Goddang Cool Quick ManVolt Man the RealAlastorWar Blur
Psycho Path
Totem Polen PlusTotem Polen EXBone DragonSpider PottonRecluse WomanInternet DestroyerCursorSakuya IzayoiToad Man Bubble BaseSplash Woman's RevengeHaiker GCWU-41BIntest TinheadBaskette Ball
Other
SRARA JoeSRARA Shield AttackerDuo
Chapter 3 Bosses
SRARA MetChesderChesder's RevengeRed Arremer ManAmoeba DroidPsionic ManGiga Count 2.0Cloud Devil 2.0Toad Man
Null and Void
Alter ArchiveBig ChungusDust ManElec ManElec SpineHatter JoeIllumina AlphaMagmatronMega Man 2 NETAPepsi Man's RevengePico ShuffleQuick ManTrailing Zero
Final Bosses
SRARAUnununiumTrio
Optional Bosses
Hyper PicketmanYamato ManCutter GolemFlame GolemIcicle GolemZap GolemPsycho GolemGameStop Duck